Getting Ready to Dig
BEFORE DIGGING: Although you are not required to notify Call Before You Dig (CBYD) for shallow excavations done by hand, CBYD encourages you to call. Even hand tools can damage utility lines. If you are using any type of heavy equipment, you are required by law to call. Dial 1-800-922-4455, or 811. Visit the Call Before You Dig website for a homeowner’s guide to the CBYD service. One important note: this service will not locate small utility lines such as wires run from your house to outside fixtures. These things are your responsibility to locate.
Excavate the Rain Garden
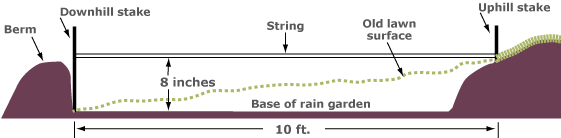
Mark out the area of the garden, based on the size you calculated for the drainage area. If the area is flat, you can remove 8-9 inches of soil from the whole area. Shape a gentle slope from the bottom of the garden to the surrounding lawn area (see figure 1 below).
If the area is sloped, you can use some of the soil that you removed from the garden to build a berm at the lower end (photo, right). If you are removing turf to install your garden, you can use some of the turf pieces on the berm so vegetation can be established quickly, and erosion potential can be reduced. When you are constructing the berm, try to make it the same level across the berm. If there is one area that is lower than the rest, overflow from the garden during a large storm may concentrate there, and cause erosion as water flows out. Keeping the water spread out is the best way to avoid erosion (see figures 2 & 3 below).
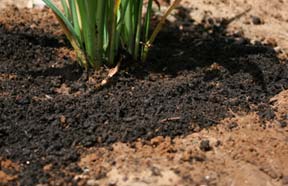
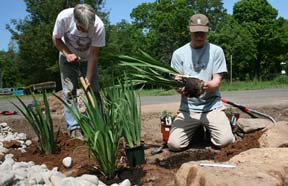
Take a shovel full of soil from the bottom, in the area where you will be planting. If the soil at the bottom is looks the same as the top layer of topsoil that you removed, you can plant directly into it. If the subsoil is lighter in color, or appears compacted, you may need to loosen it and add an amendment like compost when planting (photo, right). A rototiller can be used to loosen the soil and integrate compost at the same time.
If your soils were slow to drain, it may mean that you have high clay content. If you have the means, you can make the garden a little bigger to account for the slower infiltration rate. Alternatively, you can add some compost to the bottom of the garden when you are rototilling. If these things are not possible, don’t worry. The garden will still infiltrate some water, and every little bit helps.
If you are using a pipe to get water to the garden, you may want to consider placing some stones in the area where the pipe or gutter enters the garden. During intense storms, water inflow from the gutters can wash out mulch and/or plants. The stones will help to dissipate this energy and prevent erosion.
Digging Your Rain Garden Video
Quick Find
If the soil at the bottom of your rain garden is lighter then the top layer you will need to add an amendment like compost when planting.

A berm can be created using soil excavated from the rain garden to accommodate for a sloping lawn.
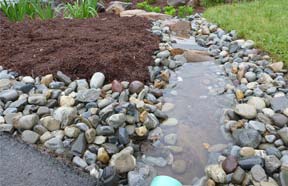
Adding stones to areas where water enters a rain garden from a pipe or gutter helps to dissipate water flow and prevent erosion.
Diagrams adapted from the University of Wisconsin-Extension, Rain Gardens: A How-to Manual for Homeowners.


Laying Out Your Plants
There are some general concepts that you can follow when planting to make your garden function well, and look pleasing to the eye.
- Choose plants appropriate for your USDA hardiness zone. Natives already meet this criterion. (Check out our Plant Database!)
- Assess how much sun your site gets. Not all rain garden plants will do well if the site is shady.
- Plan for future growth. Plant descriptions will include the mature size, so don’t over plant. However, if a “fuller” look is desired early on, it is OK to have plants a bit closer together.
- Try to group plants in odd numbers, and avoid planting in straight lines (photo, top right).
- Arrange plants so that taller ones won’t block the view of shorter ones.
- Using smaller plants such as plugs will save money, but it will take a bit longer for the plants to grow to full size.
- Some plants will do better in different parts of the rain garden, like the bottom or the side slope. Many will do OK in any area in the garden. The plant database will specify this.
- Have fun! You will be the one looking at this garden, so make it however feels right for you.
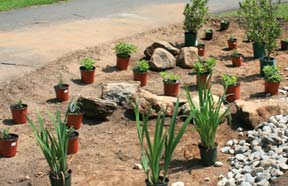
There are many factors to consider when designing the layout of your rain garden, but the most important is that it looks right for you.
Set the plants in the ground so its surface soil is level with the bottom of the rain garden. (If plants are root-bound, try to loosen up the roots before planting them.)
Once the plants are installed, mulch the area with 2-3 inches of mulch, being careful not to put the mulch too close the the plants base.
Planting
Once your soil is ready, you can begin planting.
- Dig the holes for the plants. The holes should be at least twice as wide as the plant's root structure and deep enough so that the surface of soil in the pot is level with the soil in the bottom of the garden.
- Amend the soil as needed (see Excavate the Rain Garden section above).
- If the plants are root-bound, try to loosen up the roots before planting them (photo, middle right).
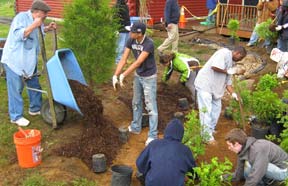
- Once all the plants are installed, you are ready for mulching. Add about 2-3 inches of mulch, being careful not to put the mulch too close the the plants base (photo, bottom right).
- Water your plants immediately after planting and one inch of water per week (unless it rains) until the plants are established.
Rain Garden Plant Selection and Layout Video
For citation purposes: University of Connecticut’s Center for Land Use Education and Research. (December 30, 2021). Design and Installation. https://nemo.uconn.edu/raingardens/installation/